- Indications and contraindications
- Consent
- Preparation
- Oxygenation
- Sedation
- Topicalisation
- Performance of technique
- References
Indications and contraindications
Indications: Patients with head and neck pathology eg. malignancy and previous radiotherapy, who often have reduced mouth opening, limited neck extension, OSA, morbid obesity, and/or progressive airway compromise
Absolute contraindications: Patient refusal
Relative contraindications: Local anaesthetic allergy, airway bleeding, uncooperative patients
Consent
Ensure the patient is well informed about the reason for ATI, a walkthrough of your technique, the local anaesthetic including the fact that it tastes unpleasant, warn about cocaine effects if you’re using it, method of oxygenation, method of sedation, coughing and hoarse voice, Berman airway or other channel use, and going to sleep once intubation has been successful. Patient cooperation is key in successful ATIs.
It is important to inform them that you have alternative plans if it is unsuccessful and that you will have additional team members in the anaesthetic room/theatre with you and what their role is in keeping the patient safe.
This is all particularly important if the patient may need to come back for further procedures, as a bad experience may lead to loss of trust and patients having unpleasant traumatising memories of the procedure.
Patient leaflet from the Difficult Airway Society (DAS)
Video of one technique by DAS, for patient education:
Preparation

People, places, and things is my go-to mnemonic.
People: Consented and cooperative patient, maxillofacial/ENT surgeons +/- scrubbed, experienced ODPs, 2 experienced anaesthetists especially if using fully awake technique, theatre staff with ENT packs ready if needed
Place: ENT theatre, ENT anaesthetic room, emergency theatre are all options – ideally somewhere safe that you are familiar with and can get help and other equipment quickly. Minimising cognitive burden of location can be very helpful.
Things:

Oxygenation

High flow nasal oxygen (HFNO) is the technique of choice for ATI techniques (and other parts of anaesthesia and critical care!)
There are a number of devices available, including a standard nasal cannula, adult high flow nasal cannula, the Fisher and Paykel Airvo 2 machine via the Optiflow interface (photo above), and Vapotherm precision 2000i high flow therapy (photo below).

This is a useful BJA article on HFNO in 2017 which explains HFNO to excellent detail.
The most commonly used device in Oxfordshire is the Airvo 2, and this is a manufacturer video of how it works:
The device can deliver 60L of 100% oxygen or oxygen and air mixture through a nasal cannula device for adults, children and tracheostomies. The gas delivered is warmed to 37 degrees and humidified to 98%- 100%.

The main benefit of HFNO in this particular setting of ATI is the oxygen reservoir preoxygenation and high FiO2, allowing us more time for airway instrumentation and rescue if the patient is oversedated and becomes apnoeic. Starting the case at 25-30L/min flows and gradually increasing if needed is more comfortable than starting immediately at 60L/min as the patient may not be used to so much CPAP. Oxygen can be titrated as required using the digital display or the rotameter on the machine, depending which machine you have. As with ordinary preoxygenation, a FiO2 close to 1 will give you the best chance of achieving CO2 washout and denitrogenation of the lungs and creating that safety reservoir of oxygen.
Apply it as soon as the patient is positioned on the bed and titrate the flows up to between 30-60L/min. The DAS guideline recommends up to 70L/min but this is not available on the Airvo system. There is no inbuilt capnography on the nasal device so if you are using sedation you have to be careful with respiratory depression – the best method is to monitor the patient clinically, or there are options to put capnography sensors on the side of the patient’s mouth with some tape (not always accurate).
Sedation
ATI can be achieved with or without sedation. If sedation is used, the aim is for minimal sedation that does not affect the patient’s breathing or haemodynamics or ability to speak or respond normally to verbal instructions, and yet be deep enough that the patient is relaxed. If using sedation make sure you clearly state to the patient that they may remember some parts of the procedure and this is not accidental awareness under general anaesthesia. This is an excellent patient information leaflet from the RCoA on sedation that you might find useful.

Having a second anaesthetist to run the sedation and monitor the patient for respiratory depression and haemodynamic compromise is the safest approach if you are providing sedation. If you are not an expert, keep your technique ‘clean’ by using a single agent, such as remifentanil TCI and dexmedetomidine infusion if this is available. Propofol is familiar but is associated with a higher risk of coughing, airway obstruction and over-sedation than remifentanil (Grade A evidence on the DAS guideline). Midazolam is less titratable but reversible with flumazenil and is appropriate for use.
The following table are special circumstances that might make you decide against sedation or modify your technique.
| Factors that might lead you to avoid or minimise sedation | Patient group to consider | Modifications that can be made |
| Limited physiological reserve to tolerate adverse consequences of over-sedation including risk of aspiration, hypoxia, CVS instability | Critically ill, pregnancy, trauma, elderly | For foetal considerations, avoid propofol/fentanyl and alfentanil, warn the neonatologists |
| Risk of airway loss | Acute airway obstruction and stridor or severe trismus, craniofacial trauma |
Topicalisation
It is incredibly important to properly topicalise the airway. If using sedation, start this before topicalisation as this can be uncomfortable.
Lidocaine is the safest drug and the maximum safe dose is 9mg/kg but this is rarely required. The total dose of all local anaesthetics administered, regardless of route (e.g. regional anaesthesia or surgical infiltration), must also be considered. The drug preparation crib sheet above gives you all the doses of the drugs used. The DAS guideline does not recommend cocaine as evidence shows that the high risk of cardiovascular disturbance is not outweighed by its analgesic efficacy compared to co-phenylcaine.
Sensory innervation of the airway – that old chestnut.
NYSORA’s page on regional anaesthesia for awake tracheal intubation is excellent and has all you need to know. Highlights from the page:
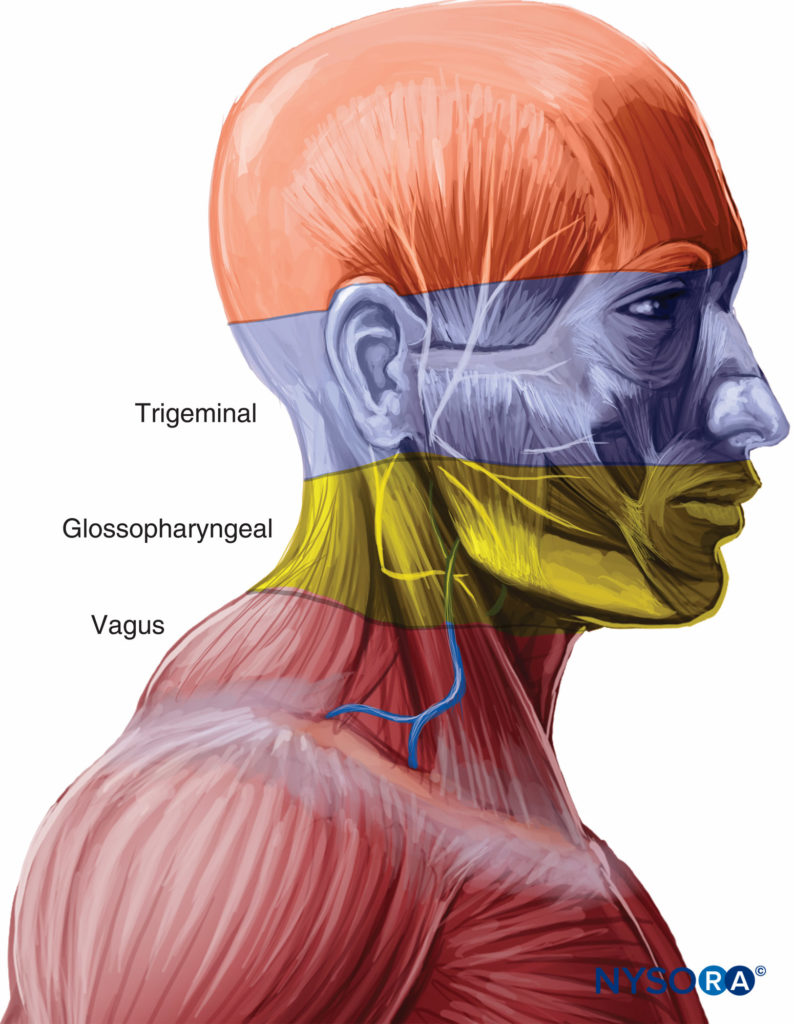
Sensation of nose: Septum and anterior parts of the nasal cavity are affected by the anterior ethmoidal nerve (a branch of the ophthalmic nerve). The rest of the nasal cavity is innervated by the greater and lesser palatine nerves (branches of the maxillary nerve).
Sensation of pharynx: Glossopharyngeal nerve
Sensation of oropharynx: Vagus, trigeminal and glossopharyngeal nerves. Anterior 2/3 of tongue = lingual nerve branch of trigeminal, posterior 1/3 tongue = tonsillar nerve branch of glossopharyngeal nerve. Posterior wall and lateral wall of pharynx = vagus.
Sensation of larynx: Vagus nerve: Above cords = internal branch of superior laryngeal nerve and below cords = recurrent laryngeal nerve.
Local anaesthetic blocks for airway instrumentation
3 types: glossopharyngeal nerve block, superior laryngeal nerve block and translaryngeal/cricothyroid block of the recurrent laryngeal nerve.
Check out the NYSORA page for a step by step, but the highlights for a viva station would be:
- Glossopharyngeal block: Easily blocked where it crosses the palatoglossal arch. Inadequate for awake fibreoptic but useful to block the gag reflex. Can be blocked with injection around nerve or gauze or pledgets soaked in LA in the palatoglossal arch for 5-10 minutes.
- Superior laryngeal nerve – blocked externally via landmarks (inferior lateral to cornu on hyoid bone on the side you are aiming to block) or with US guidance, risk of blocking only the internal superior laryngeal nerve or material puncture. Blocked internally with gauze or pledgets soaked in LA placed in the piriform fossae for 5-10 minutes.
- Recurrent laryngeal nerve block via the translaryngeal block through the cricothyroid membrane because you’ll cause bilateral vocal cord palsy and airway obstruction if you partially block the recurrent laryngeal nerves.
Cricothyroid puncture is interesting – it is the same technique for needle cricothyroidotomy. Use a 23G or 20G cannula with a syringe of 2-4% lidocaine (2-3ml), identify landmarks, clean the skin, aspirate as you go through the cricothyroid membrane, with air as the end point. Inject local anaesthetic on deep inspiration and this may induce violent coughing – warn the patient! It is a topicalisation technique but some use it as a rescue oxygenation technique.
NYSORA has done very clear photos of the blocks, samples below:


Local anaesthetic preparations


Methods of applying local anaesthetics
Nose and/or mouth:
- Spray nozzle
- Mucosal atomisation device
- McKenzie technique
- Cotton applicators (or nasal packs or gauze soaked with local anaesthetics)
- Nebulised lidocaine
- Gargling of 4ml 2% viscous lidocaine for 20-30 seconds then spitting out
Spray nozzle – directly from the bottle of local anaesthetic as pictured above. Asking the patient to sniff while spraying the nasopharynx can help with distribution of the local.
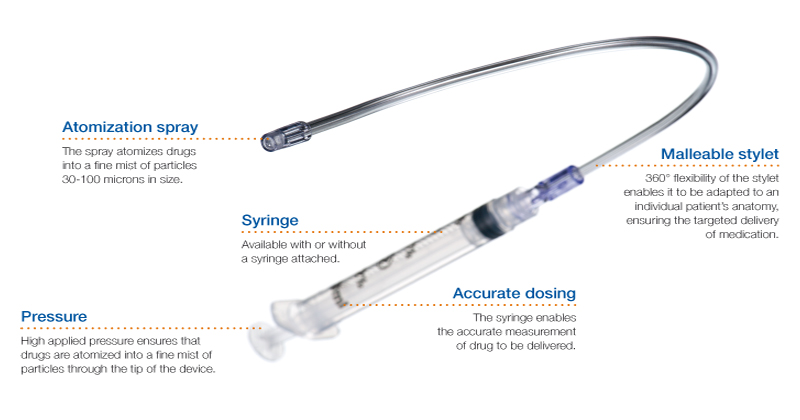
Mucosal atomisation device (MAD):
The McKenzie technique is a bit more Blue Peter and requires a 20G cannula attached to about 4L oxygen through oxygen bubble tubing via a 3 way tap and a 1ml syringe:

Nebulisers – 5ml of 4% lidocaine (200mg) can be delivered to a patient for 30 minutes via the nebuliser particularly if there is limited mouth opening. Note – there is up to 50% of drug loss as particles >100micrometers condense in mouth and pharynx. This is not as good a technique as atomisation with the MAD but useful if the patient has severe trismus.
Local anaesthetic soaked in gauze, cotton or nasal packs can also be used.
Larynx and/or trachea:
- Nebulisers
- Spray as you go technique
- MAD device
- Cricothyroid puncture
Spray as you go is via a syringe of lidocaine through the luer lock connector and an epidural catheter through the port of the intubating bronchoscope as below. Topicalise the epiglottis, vocal cords then trachea, with 2ml to each place of 2-4% lidocaine. Wait 1-2 minutes before moving to the next area.
A combination of techniques is usually used for topicalisation. For example, co-phenylcaine spray to the nose + spray as you go technique for oropharynx onward; or lidocaine spray to the mouth and MAD device. Calculate the doses of local anaesthetic used, for example:
- Cophenylcaine 5 sprays per nostril = 50mg
- 6ml 4% lidocaine from MAD device in the mouth = 240mg
- 6 ml 4% lidocaine ‘spray as you go’ = 240mg
- Total = 530mg (7.5mg/kg for a 70kg person)
Test topicalisation by suctioning gently with a soft suction catheter or Yankauer, ideally one with a rosebud tip to avoid damage to the mucosa (photo below). This has dual effect of testing your topicalisation and getting rid of your secretions!

Performance of technique
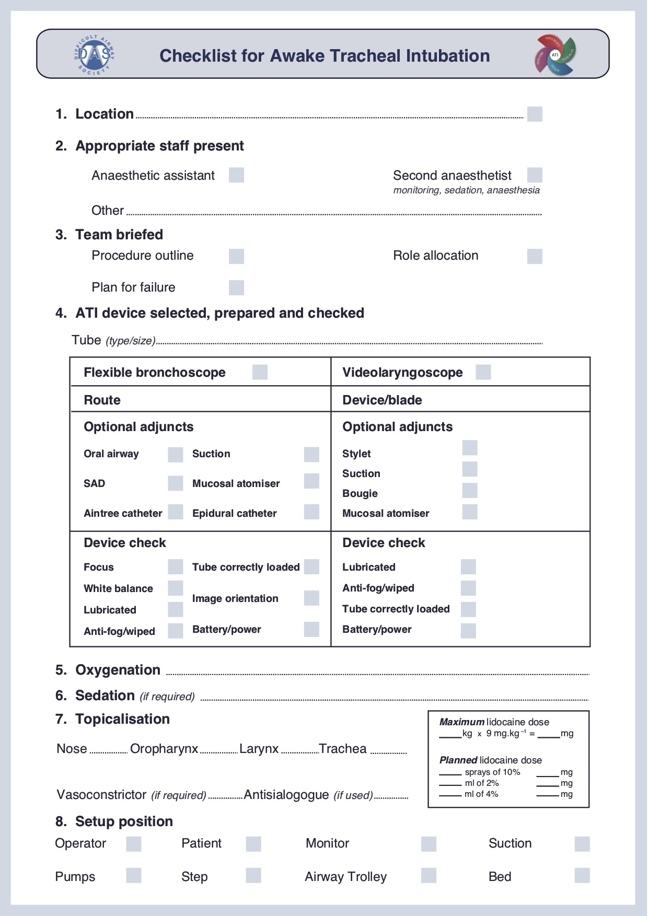
There are loads of things to think about with awake intubation – the best advice is practice! Here is a checklist to reduce your cognitive burden by DAS:
This is the DAS ergonomics outline for procedural set up depending if you are standing in front of (a) the patient or behind them (b). The idea from the figures are that the primary operator should be able to see the patient monitor, machine, video screen and have direct access to the pumps and equipment. The advantage of standing in front of the patient is that you can see the patient and monitor them directly, they can be sitting up to help reduce the risk of aspiration or reducing FRC or lung capacity. The advantage of standing behind the patient is that it is a far more familiar position for you and gives you the option of immediately using other techniques eg. laryngoscopy and tilting the trolley back in the event of aspiration.

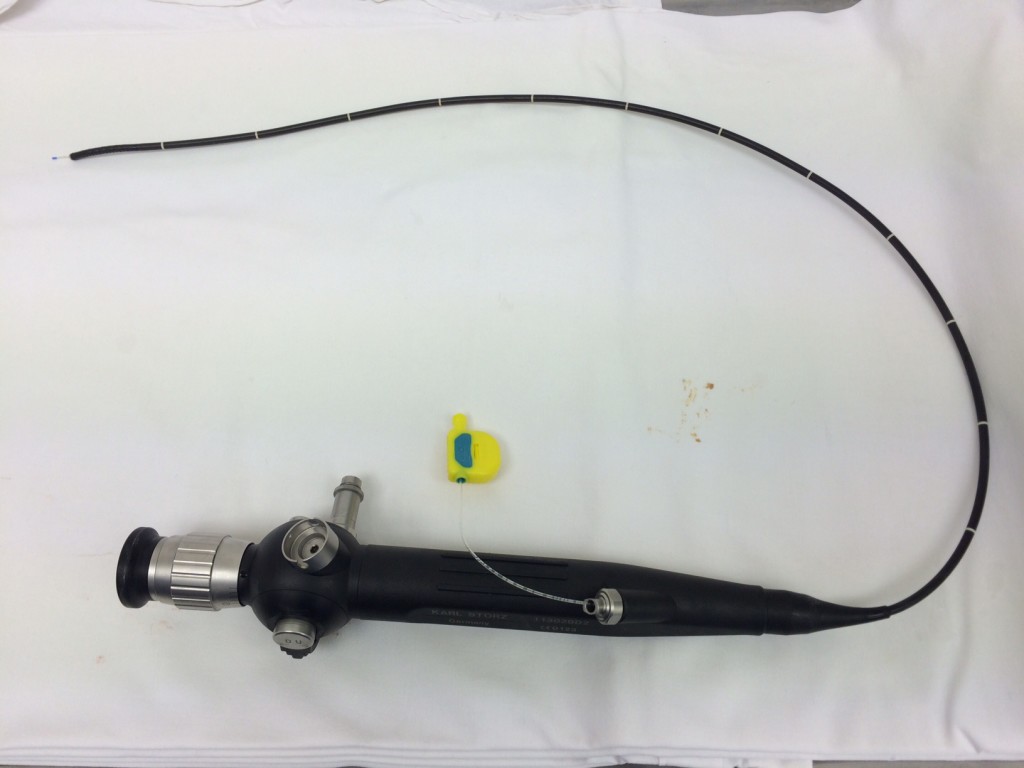
Scopes
Let’s talk a little about the scopes used.
The scopes are either:
- Fibreoptic or video scopes (differ on image transmission)
- Single use (eg. Ambu aScope) or reusable (Olympus LF-V or LF-GP)
Fibreoptic scopes = back to physics! The light source at the end of the tube is transmitted to the viewer at the top of the tube with the power of total internal reflection. Ordinarily, when light passes from a medium with one index of refraction to another with a lower index of refraction, it will refract away from the normal line.
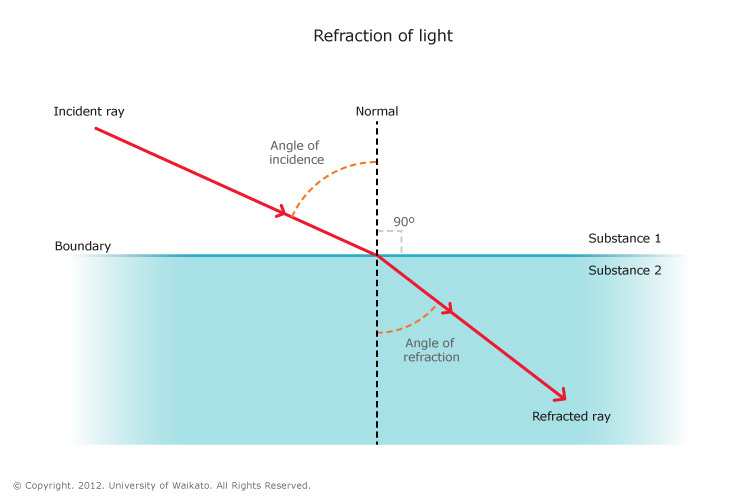
However, if the angle of light is greater than a particular critical angle for that material, light will not refract away from the normal line, but will instead reflect back against itself – total internal reflection. In an optical fibre, there are 3 layers of material – a core, cladding and buffer coating. The core is the thin glass centre where the light travels, cladding is the outer optical material with a lower refractive index, and the buffer coating is the plastic coating that protects the fibre. the angle of light is always reflecting from the cladding no matter what angle the fibre itself gets bent at, and can travel great distances with very little signal degradation (there is some degradation from the impurities in glass). The light source is usually a battery powered one at the tip or a cable powered halogen or LED at the tip.

In videoscopes, there is a lens at the very tip of the scope and the camera chip is inside the distal end of the scope. The camera chip itself converts the image into digital signals so the rest of the scope does not require that fiberoptic component for image transmission. The light source may be fiberoptic from the top of the scope, but the image is not dependent on it. If you read St Vincent’s hospital guidelines on awake tracheal intubation, they explain the differences between the two in much more detail.
Many scopes apply fibre optic principles in some way, so any damage to the cladding or the core will lead to image degradation and therefore they are incredibly fragile and sensitive to damage and have to be kept very carefully to prevent this – repairs are super expensive! Make sure you properly lubricate the scope before using and don’t push it against resistance.
The Ambu aScope is an example of a videoscope with no fiberoptic component. It uses a camera sensor at the tip of the scope which is connected via electrical wiring to the video display. Most models used in Oxfordshire are disposable.
Technique
The finer techniques of how to manipulate the scope to perform bronchoscopy is outside the scope of this article, however St Vincent’s has a great description of step by step anatomy.
The earlier patient education video of ATI shows the video view also, but here’s a bit more detail with some top tips from a few American anaesthetists:
What if it fails?
The DAS guideline define an unsuccessful attempt as the unplanned removal of the flexible bronchoscope/videolaryngoscope or tracheal tube from the airway. They recommend minimising the number of attempts (3+1 similar to the standard difficult intubation guidelines) to 3 and have the final attempt by a more experienced operator which may include a surgeon. The following is their rescue guideline if ATI is unsuccessful.

What do we do once we’ve intubated?
It is now safe to anaesthetise your patient for the procedure. If using remifentanil + propofol TCI you can easily change this to a TIVA technique. If not, then perform a standard induction with your drugs of choice.
Note – extubation is going to require equally comprehensive planning and all the people, places and things that you needed initially. You might want to consider the following before extubation:
- Checking the view again for airway surgery – the direct laryngoscopy view may have improved (or not!) which will help you decide how to extubate and how to advise your colleagues for any subsequent airway management.
- Suction appropriately to avoid trauma to the airways
- All the kit required for intubation should be there for extubation
- Consider deep or awake extubation – including switching to a supraglottic airway
- Topical lidocaine has a dose dependent duration of analgesia for up to 40 minutes (although we say 2 hours as this is the terminal elimination half life) so patients should be nil by mouth for at least 2 hours post airway topicalisation for ATI.
- Document everything you’ve done clearly in the method that DAS recommended to perform the procedure: oxygenation, topicalisation, sedation, device and ETT used, approach (oral/nasal right, nasal left) number of attempts and complications.
References and resources:
2015 CEACCP article on awake intubation
NYSORA’s article on regional and topical anaesthesia for awake intubation
St Vincent’s hospital in Victoria, Australia have produced an excellent document on awake tracheal intubation. This is their 2016 edition. Some of the equipment is different but all the principles are useful and applicable. Be sure to catch their top tips and tricks – all incredibly useful.
ORSIM has a great bronchoscopy simulator which is available in the John Radcliffe.
Airway Ex is a great free app for using on your iPad/iPhone/Android device with loads of simulation based on real cases.
